Writing JUnit tests for Java classes in Eclipse and Netbeans IDE is super easy, and I will show you that later in this JUnit tutorial. Before that, let’s revise what is a unit test and why should you write them. A unit test is to test a smaller unit of code, e.g. methods. Writing a unit test to test the individual unit of code is one of the best development practices and helps to find bug earlier in the development cycle. Though there is another unit testing framework available in Java e.g. TestNG, JUnit has its own place among Java developers. IMHO code review and unit testing are two most important practices for improving code quality and should always be followed during software development.
The sad thing is that not every developer follows it; some programmer doesn't write unit tests due to ignorance and others due to laziness. Anyway, it just starts which take time, once you start writing unit tests, you will automatically start enjoying it. I have seen Java developers testing their code with the main() method, but now they prefer to test them with JUnit test cases.
I agree few initial tests are difficult because of knowledge and inertia and the best way to approach is to start with the simplest of JUnit tests. In this JUnit tutorial, I will show you how to write and execute the JUnit test from Eclipse and Netbeans, two popular Java IDE.
By the way, if you are looking for any good book on JUnit and unit testing, you should look at Pragmatic Unit Testing in Java with JUnit, it's an amazing book and teaches a lot about both JUnit and unit testing in Java.
JUnit 3 and JUnit 4 testing framework
JUnit frameworks are popular from quite a some time now and there are two popular versions available in the form of JUnit 3.8, known as JUnit 3 and JUnit 4. Working of both versions is the same, as you create test cases, test suites and execute them.
The main difference between JUnit 4 and JUnit 3 is that, JUnit4 is based on annotation feature of Java 1.5 and easy to write, while JUnit 3 uses “test” keyword, to identify test methods. What is bonus in terms of writing JUnit tests for Java program is that, two of most popular Java IDE, Eclipse and Netbeans has inbuilt support and provides easy interface and infrastructure to create and execute JUnit tests for Java classes.
In this JUnit 4 tutorial, we will see step by step guide for writing JUnit test in Eclipse and Netbeans with simple example of Calculator. Our Calculator class has methods add() and multiply() for addition and multiplication, I have used variable arguments of Java 1.5 to implement these methods, so that they can accept any number of parameter.
How to write JUnit tests in Eclipse
1. Create a New Java Project called JUnitExample.
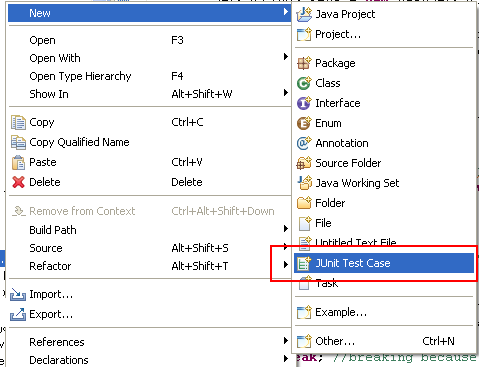
3. Right click on Java class and click on create Junit testcase
How to execute JUnit tests in Eclipse
Now you have your Junit test created, you can execute it just like you run any Java application:
Right Click --> Run As --> Junit Test
This will run all the JUnit tests declared in this class and will pass if all the tests run successfully and pass the condition tested by various assert statements and fail if any of the JUnit tests failed. The eclipse will print stack trace and hyperlink to the failed test and you can go and fix the problem.

Why are my JUnit results not showing up?
Some time when all JUnit tests passed you may not see any result, because of an option called "Show Failures Only". For more satisfying results, go to the downward-pointing triangle at the right end of the JUnit pane, and make sure Show Failures Only is not checked, as shown in the following screenshot.Some time your JUnit test will not succeed i.e. it will fail or run into an error. In JUnit, there is a difference between a "failure" and an "error"? A failure is when one of your assertions fails--that is, your program does something wrong, and your JUnit test notices and reports the fact.
An error is when some other Exception occurs due to programming mistakes, such as a NullPointerException or an ArrayIndexOutOfBoundsException. Both errors and failures are not good for your code. A good Junit test case should be able to bring failure and error alike. You should also ensure that your JUnit test case should pass always and doesn't throw any errors or failures.

How to create a JUnit Test suit in Eclipse? Example
Like individual unit tests, you can also create a test suite for creating tests for more than one classes in Java. In order to create a JUnit test suite in Eclipse Go to File → New → Other... → Java → JUnit → TestSuite, and click Next>. Select all the classes, and click Finish. Once created, You can run this test suite the same way you run other JUnit tests. The result of the JUnit test suite will also show in JUnit console-like the previous run.
How to write JUnit tests in Netbeans
JUnit support in Netbeans is also great and seamless. Here is the steps to create JUnit test in Netbeans
1. Create a New Java Project called JUnitExample.
2. Create a Java Class Calculator in project which should have add() and multiply() method.
3. Now Select a Java Class --> Right click --> Tools --> Create Junit tests
this will create Junit test class for all the methods of selected Java class.
How to execute Junit tests in Netbeans
Executing JUnit tests in Netbeans is much simpler than it was in Eclipse. Go to your Junit test class and right-click and select run File option. This will execute all the JUnit tests on File and show the result in console. As earlier test will be pass if all test method passes otherwise it will fail. Netbeans also shows complete stack trace and hyperlink of failed test cases.
Code
Here is complete code example of, How to write unit test in Java using JUnit framework. In this example, we have a Java class called Calculator, which has two methods add() and multiply() and takes variable arguments. In this JUnit tutorial, we will write JUnit testcases, to test these two methods.
/**
* Simple Java Calculator with add and multiply method
*/
public class Calculator {
public int add(int... number) {
int total = 0;
for (int i : number) {
total += i;
}
return total;
}
public int multiply(int... number) {
int product = 0;
for (int i : number) {
product *= i;
}
return product;
}
}
Following class CalculatorTest is our JUnit test class, it contains two methods testAdd() and testMultiply().
Since we are using JUnit 4, we don’t need to use prefix test, but I have used that to make test methods explicit. @Test annotation is used by JUnit 4 framework to identify all test cases. If you are new to JUnit 4, then see this post to learn more about JUnit 4 annotations.
By the way, when we run this class as JUnit Test, it will show how many test cases pass and how many failed. If all the test cases pass then it will show a green bar, otherwise a red bar to indicate failure.
import static org.junit.Assert.*;
import org.junit.Test;
/**
* JUnit Test class for testing methods of Calculator class.
*/
public class CalculatorTest {
@Test
public void testAdd() {
Calculator calc = new Calculator();
assertEquals(60, calc.add(10,20,30));
}
@Test
public void testMultiply() {
Calculator calc = new Calculator();
assertEquals(6000, calc.multiply(10,20,30));
}
}
That’s all on How to write unit tests in Java using the JUnit framework in Eclipse and Netbeans. JUnit testing framework is very useful for writing and executing unit tests for Java classes and it can also be integrated into a build system by using ANT and Maven, which means you can all your tests automatically at build time.
By the way, since many projects have their JUnit test running during the build process, it’s good to keep unit tests short and quickly executable to avoid lengthy builds. See JUnit best practices guide more unit testing practices. Also start using Junit 4 annotations, they have made the job of writing unit tests much easier.
By the way, since many projects have their JUnit test running during the build process, it’s good to keep unit tests short and quickly executable to avoid lengthy builds. See JUnit best practices guide more unit testing practices. Also start using Junit 4 annotations, they have made the job of writing unit tests much easier.
16 comments :
Very interesting articles, I've read them for a while and I've learned a lot of useful things and tricks.
I think a mistake has slipped into this one; please check the test for multiply method, is calling the add method instead of multiply.
@Anonymous, good catch :), it should call multiply method, correct now.
Testing with main method is not a bad idea either, but yes it doesn't tell whether you test is successful or not, until you use assertion provided by JDK.
Not sure if you have intentionally done this to find the error in junit test case, but shouldn't product be initialized to 1 instead of 0 in multiply() method ?
I am looking for a unit test case which tests the program which is written for reading HTML from any website and save it to any file(.txt).
Can you help?
How to create suite of Unit test in JUnit 4 verison?
Should be this.
0*10*20*30 is still a goddamn zero.
public int multiply(int... number) {
int product = 1;
for (int i : number) {
product *= i;
}
return product;
}
Right. In multiply must product = 1
@Anonymous, @Bnktop, I think that's the bug he wants to catch you by writing JUnit test, I would say a better example, because once you run that test, it will fail and give you task to find out what is wrong, there you will find that produce should be assigned 1, instead of zero.
Better way to run JUnit test is from package explorer window, just select a Unit test, right click and say run as JUnit test. You can even run multiple Unit test by either selecting a package or test folder itself, this will run all JUnit test one by one. If your test throws error, just put a breakpoints at the point they are failing to know the root cause of problem.
Netbeans example - would the test class go under Test Packages? The imports did not work, package is missing, Though I think its just info that I lack, that is why I came here. Back to the drawing board. Thanks for the info, but may not be enough for the totally ignorant to start with.
in eclipse after Run as Junit Test, I am getting following error:
java.lang.ClassNotFoundException: com.altair.junit.test.CalculatorTest
Hello Vijay, did you created a class called CalculatorTest? you should run it from there. If you have created this class inside package com.altair.junit.test, make sure you define them using package statement at top of the class as :
package com.altair.junit.test
class CalculatorTest{
...
}
Hi Javin, Yes firstly i created class Claculator with twi method add() and mutiply(), then created JunitTestCase name as calulatorTest inside com.altair.junit.test package, and Run as Junit Test.Getting
java.lang.ClassNotFoundException: com.altair.junit.test.CalculatorTest error.
do you still get this error after putting package statement?
Hi this is Arnob. I want to know if we will be allowed to run JUnit Tests on Eclipse or from command line during java programming interviews??
Post a Comment