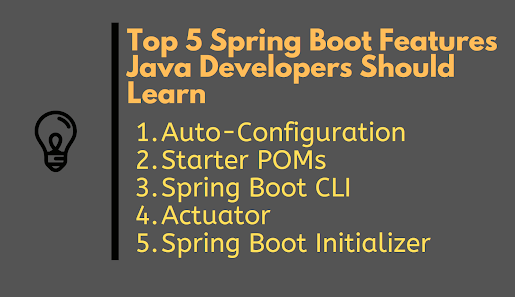
You might have heard about Spring Boot and its magical powers about creating a Spring Web application in just under 140 characters which can be written in a tweet, but what does that really mean? What are those features which provide Spring Boot such power and make Spring application development so easy? Well, that's what you will learn in this article, but if you are in hurry let me tell you that you will learn about Spring Boot's auto-configuration, Starter dependencies, Spring Boot CLI, Actuator, and Spring Initializer feature in detail. These are the feature that takes away most of the pain and friction associated with writing a Spring-based Java web application.
But, before going into this detail, let's revisit the problems associated with Spring-based Java development. I personally like to see the problem first and feel it before I can enjoy the solution.
But, before going into this detail, let's revisit the problems associated with Spring-based Java development. I personally like to see the problem first and feel it before I can enjoy the solution.
Remember, comfort feels better only after hard work and so is a meal, you enjoy more when you are hungry.
Spring is no doubt a great framework it does a lot of things for you, for example, it creates an object for you, it provides them with their dependency, it takes away a lot of code you would have written if Spring doesn't exist but in return, it also asks a lot from you in terms of configuration and learning.
If you have ever worked on a greenfield project, where you have started afresh Spring-based Java application from scratch you know that it's not a piece of cake.
You first need to find all the dependencies you need and then their compatible version. You also need to configure a lot of beans to enable some Spring magic.
For example, if you want to create a Spring MVC-based REST application that supports JSON format in embedded tomcat then you have at least 8 to 10 dependencies in your Maven pom.xml file e.g. spring-core.jar, spring-mvc.jar, jackson.jar, embedded-tomcat.jar, etc, and mind it this is a very simple setup.
Btw, if you are a complete beginner into the Spring Boot world then I also suggest you first go through Spring & Hibernate for Beginners (includes Spring Boot) course on Udemy. It's a very short course, just 1.5 hours long but gives you enough knowledge to use Spring Boot in your project. It also enables you to explore further on your own.
5 Essential Spring Boot Features for Java Development
Spring Boot just takes away all these pains and lets you write the code which matters i.e. application code. All of the Spring Boot features which I mentioned like auto-configuration, Starter POMs, or Starter dependency and Spring Boot CLI aim to simplify Java development with Spring.Now, let's go into a little bit more details on each of these features
1. AutoConfiguration
You might have worked with a Spring-based Java web application that connects to a relational database like an in-memory database like H2 and if yes then you might know that you need to declare JdbcTemplate as a bean and also need to configure a DataSource which is a dependency for JdbcTempalte.In a modern-day Spring application, which uses Java-based configuration, you need to add the following two methods into your Configuration class:
@Bean
public JdbcTemplate jdbcTempalte(DateSource ds){
   return new JdbcTempalte(ds);
}

@Bean
public DataSource dataSource(){
  return new EmbeddedDatabaseBuilder()
     .setType(EmbeddedDatabaseType.H2)
     .addScripts('ddl.sql', 'data.sql')
     .build();
}
This is not really complex for someone who has done Spring development but if you are starting afresh then it can take hours and days to figure out this.
But, more importantly, this is a piece of code which many of us have written irrespective of our application. I mean, this code is not unique and every single Spring application which works with JDBC will need it.
That's where Spring Boot AutoConfiguration comes into the picture.
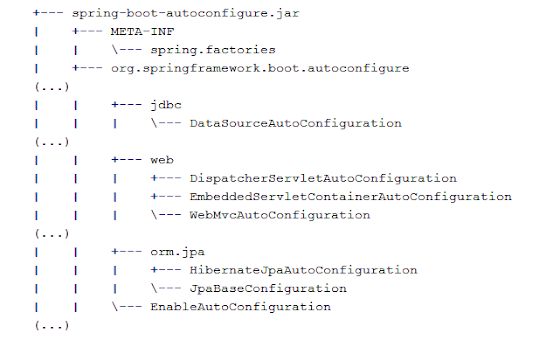
Spring Boot's Auto-configuration feature detects the presence of a certain Class in the Classpath and then automatically configures it for you.
For example, if you have added JdbcTempalte into your classpath and also H2.jar then Spring Boot can automatically configure an in-memory database for you and a JdbcTempatle which is ready to use. You don't need to write the above code to use JdbcTemplate in your DAO layer.
This is just an example. Spring Boot auto-configuration makes more than 200+ such decisions and automatically configure many functionalities by examining JAR dependencies. For example, if spring-mvc.jar is present then it can automatically configure DispatcherServlet, InternalViewResolver, etc.
If JPA and Hibernate are present then it can configure that as well and if you have spring-security.jar then it can even configure basic security to protect your application.
Btw, when it comes to relying on auto-configuration, in-depth knowledge is required to properly protect your application. If you are interested in Spring Security, check Spring Security Masterclass by Eugen Paraschiv.
The Auto-Configuration feature is by default disabled and you need to enable it by using @EnableAutoConfiguration or @SpringBootApplication annotation on your Configuration class. I normally annotated the Main class, which I am going to run with an embedded Tomcat server.
It's recommended to use @SpringBootApplication annotation from Spring Boot 1.2 onwards as it combines a couple of other annotations to make your code more readable. See Learn Spring Boot - Rapid Spring Application Development to learn more about Spring Boot annotations.
In short, The auto-configuration feature of Spring Boot saves a lot of work and reduces the development time and I strongly recommend using auto-configuration whenever you use Spring Boot.
In order to build a simple Spring MVC based REST application that supports Jackson and to run it in an embedded container, you would at least need the following dependencies e.g.
By using Spring Boot Starter POMs or starter dependency feature, you can get all of these by just adding spring-boot-starter-web dependency in your pom.xml
So, instead of adding all these dependencies and worrying about their compatible version, you just need to add one.
For example, if you have added JdbcTempalte into your classpath and also H2.jar then Spring Boot can automatically configure an in-memory database for you and a JdbcTempatle which is ready to use. You don't need to write the above code to use JdbcTemplate in your DAO layer.
This is just an example. Spring Boot auto-configuration makes more than 200+ such decisions and automatically configure many functionalities by examining JAR dependencies. For example, if spring-mvc.jar is present then it can automatically configure DispatcherServlet, InternalViewResolver, etc.
If JPA and Hibernate are present then it can configure that as well and if you have spring-security.jar then it can even configure basic security to protect your application.
Btw, when it comes to relying on auto-configuration, in-depth knowledge is required to properly protect your application. If you are interested in Spring Security, check Spring Security Masterclass by Eugen Paraschiv.
The Auto-Configuration feature is by default disabled and you need to enable it by using @EnableAutoConfiguration or @SpringBootApplication annotation on your Configuration class. I normally annotated the Main class, which I am going to run with an embedded Tomcat server.
It's recommended to use @SpringBootApplication annotation from Spring Boot 1.2 onwards as it combines a couple of other annotations to make your code more readable. See Learn Spring Boot - Rapid Spring Application Development to learn more about Spring Boot annotations.
In short, The auto-configuration feature of Spring Boot saves a lot of work and reduces the development time and I strongly recommend using auto-configuration whenever you use Spring Boot.
2. Starter POMs
While Auto Configuration takes away the pain of configuring common functionalities, the Starter POMs take away the pain by finding and adding common dependencies in your project.In order to build a simple Spring MVC based REST application that supports Jackson and to run it in an embedded container, you would at least need the following dependencies e.g.
- spring-core.jar
- spring-web.jar
- spring-webmvc.jar
- jackson-databind.jar
- tomcat-embed-core.jar
- tomcat-embed-el.jar
- tomcat-embed-logging-juil.jar
By using Spring Boot Starter POMs or starter dependency feature, you can get all of these by just adding spring-boot-starter-web dependency in your pom.xml
So, instead of adding all these dependencies and worrying about their compatible version, you just need to add one.
You will also be more confident that tried and tested versions of libraries are used and there won't be any incompatibility issue in the future.
Another subtle benefit of the starter POMs feature is that you don't need to remember or search dependencies.
Another subtle benefit of the starter POMs feature is that you don't need to remember or search dependencies.
If you are building a web application you can add a 'web' starter, if you are building a JPA application you could add 'jpa' starter, by aggregating common dependencies by functionalities Spring Boot has made them easy to remember and use.
Btw, if you are wondering how the Starter POMs feature works internally then let me tell you all the magic comes from Maven or Gradle's transitive dependency feature.
It's Maven or Gradle which pulls the right version of libraries, Starter POMs just declare them. If you want to learn more, I suggest you check out Dan Vega's Rapid Application Development with Spring Boot course.
In short, Starter POMs or starter dependency is another awesome feature of Spring Boot that really helps to simplify Spring application development. It's like a close cousin of auto-configuration and you will frequently use them together.
The Spring Boot CLI is a command-line interface provided by the Spring Boot framework which allows you to create a Spring-based web application using Groovy programming language.
Actually, Groovy and Spring Boot nicely complement each other, Groovy aims to make Java development simpler while Spring Boot aims to make Spring application development simpler and both benefit from each other's simplicity.
While auto-configuration and starter dependencies are an integral feature of Spring Boot, Spring CLI is an optional one, you also need to install Spring CLI in order to use it.
Here is a simple HelloWorld RESTful Web Service in Groovy and Spring Boot CLI and it works you can just run even without compiling as shown below:
That's it, you can run it on an embedded container that comes with Spring Boot CLI, no web.xml, no configuration, and no server setup.
If you are wondering how these whole things work i.e. how does Groovy know about @RestController and @RequestMapping annotations then let me tell you that Spring Boot CLI leverages auto-configuration and starter POMs feature to let you focus on only writing application code?
Spring Boot CLI detects that @RestController and @RequestMapping are in use and it knows which starter dependencies are required to add into classpath to make it work.
Once it downloads those series of dependencies, auto-configuration automatically kicks in and configured it for use e.g. once spring-boot-web-starter comes into the picture it downloads spring-mvc.jar, and then auto-configuration automatically configure Dispatcher Servlet and enable Spring MVC.
This whole thing looks like magic but it's a reality. If you like this model of development I suggest you go through Spring Boot in Action by Craig Walls to learn Spring CLI in depth. Craig has covered this topic really nicely.
It provides a lot of insights and metrics about a running application in production.
Btw, if you are wondering how the Starter POMs feature works internally then let me tell you all the magic comes from Maven or Gradle's transitive dependency feature.
It's Maven or Gradle which pulls the right version of libraries, Starter POMs just declare them. If you want to learn more, I suggest you check out Dan Vega's Rapid Application Development with Spring Boot course.
In short, Starter POMs or starter dependency is another awesome feature of Spring Boot that really helps to simplify Spring application development. It's like a close cousin of auto-configuration and you will frequently use them together.
3. Spring Boot CLI
In the first paragraph of this article, I said that it's now possible to create a Java web application that can fit in a tweet and it happens because of Groovy and Spring Boot CLI.The Spring Boot CLI is a command-line interface provided by the Spring Boot framework which allows you to create a Spring-based web application using Groovy programming language.
Actually, Groovy and Spring Boot nicely complement each other, Groovy aims to make Java development simpler while Spring Boot aims to make Spring application development simpler and both benefit from each other's simplicity.
While auto-configuration and starter dependencies are an integral feature of Spring Boot, Spring CLI is an optional one, you also need to install Spring CLI in order to use it.
Here is a simple HelloWorld RESTful Web Service in Groovy and Spring Boot CLI and it works you can just run even without compiling as shown below:
@RestController
class HelloSpringBootController{

  @RequestMapping("/")
  def hello() {
    return "Hello Spring Boot CLI"
   }
}
That's it, you can run it on an embedded container that comes with Spring Boot CLI, no web.xml, no configuration, and no server setup.
If you are wondering how these whole things work i.e. how does Groovy know about @RestController and @RequestMapping annotations then let me tell you that Spring Boot CLI leverages auto-configuration and starter POMs feature to let you focus on only writing application code?
Spring Boot CLI detects that @RestController and @RequestMapping are in use and it knows which starter dependencies are required to add into classpath to make it work.
Once it downloads those series of dependencies, auto-configuration automatically kicks in and configured it for use e.g. once spring-boot-web-starter comes into the picture it downloads spring-mvc.jar, and then auto-configuration automatically configure Dispatcher Servlet and enable Spring MVC.
This whole thing looks like magic but it's a reality. If you like this model of development I suggest you go through Spring Boot in Action by Craig Walls to learn Spring CLI in depth. Craig has covered this topic really nicely.
4. Actuator
The actuator is another awesome feature of Spring Boot that allows seeing what's going on inside a running Spring Boot application. With all its goodness of auto-configuration, there comes a risk of not knowing what is inside your application and that risk is addressed by Spring Actuator.It provides a lot of insights and metrics about a running application in production.
For example, by using Actuator you can find out exactly which beans are configured in the Application context, what are auto-configuration decisions made, what environment variables, system properties, command-line arguments are available to an application, and many more.
You can even get a trace of HTTP requests handled by the application, along with various useful application metrics e.g. CPU and Memory usage, garbage collection details, web requests, and data source usage.
Spring Boot Actuator also provides several endpoints to retrieve this data e.g. you can get all this using RESTful APIs or you can use its remote shell feature to securely go inside the application and get all this information by issuing commands.
It also exposes all this functionality using JMX MBeans which means you can control them at runtime using a JMX client like JConsole.
At the same time, you also need to secure access to Actuator endpoints because it not only exposes confidential information but also it's dangerous. For example, anyone can stop your application by using /shutdown endpoints.
However, you don't need to worry. Like any other Spring application, you can use Spring Security to protect Actuator endpoints. Btw, If you are not familiar with it then The Spring Security Masterclass by Eugen Paraschiv is a good place to start with.
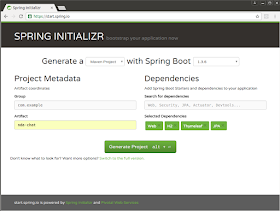
All you need to specify is to provide Project Metadata in GUI like the name of your project, Group, Artifact, etc. It also allows you to choose a starter dependency from a big list e.g. web, JPA, or security starter.
The Spring Initializer project can be accessed at https://start.spring.io/. Once you create a project you can download the Zip file and then open it into an IDE like Eclipse or IntelliJ IDEA as explained in Spring Boot Essential course by Nelson Djalo. You can then edit this sample project to put your code.
As per my experience, one of the common problem many Java and Spring developers faces is to start a project. Many of them are clueless about whether to put your Java file, resource file, etc.
Though Maven, Gradle, IntelliJ IDEA, and Eclipse help you to give the basic structure you still need to be proficient in those two skills to get a head start and if you are not familiar with Maven or your IDE, it can be a nightmare.
Spring Boot Initializer solves this problem and makes it easy to create a Spring-based Java application without really knowing about a lot of internal details of the Spring framework.
It's a really useful tool for both Spring Application developers and Java guys and If you want to learn in-depth, I suggest you check out this list of some of the best Spring boot courses.
That's all about some of the essential features of Spring Boot which Java developers should know. These features really make working with Java and Spring fun and productive and that's why more and more companies are adopting Spring Boot for Java development.
Java developers with Spring Boot experience are also in good demand and if you are looking for your next job as a Java web developer then Spring Boot skills can really make a difference.
You can even get a trace of HTTP requests handled by the application, along with various useful application metrics e.g. CPU and Memory usage, garbage collection details, web requests, and data source usage.
Spring Boot Actuator also provides several endpoints to retrieve this data e.g. you can get all this using RESTful APIs or you can use its remote shell feature to securely go inside the application and get all this information by issuing commands.
It also exposes all this functionality using JMX MBeans which means you can control them at runtime using a JMX client like JConsole.
At the same time, you also need to secure access to Actuator endpoints because it not only exposes confidential information but also it's dangerous. For example, anyone can stop your application by using /shutdown endpoints.
However, you don't need to worry. Like any other Spring application, you can use Spring Security to protect Actuator endpoints. Btw, If you are not familiar with it then The Spring Security Masterclass by Eugen Paraschiv is a good place to start with.
5. Spring Boot Initializer
Spring Initializer is another feature of Spring Boot that solves the problem with respect to the project structure. It's a web application that allows you to generate a Maven or Gradle project with Java, Kotlin, or Groovy, and Spring Boot.All you need to specify is to provide Project Metadata in GUI like the name of your project, Group, Artifact, etc. It also allows you to choose a starter dependency from a big list e.g. web, JPA, or security starter.
The Spring Initializer project can be accessed at https://start.spring.io/. Once you create a project you can download the Zip file and then open it into an IDE like Eclipse or IntelliJ IDEA as explained in Spring Boot Essential course by Nelson Djalo. You can then edit this sample project to put your code.
As per my experience, one of the common problem many Java and Spring developers faces is to start a project. Many of them are clueless about whether to put your Java file, resource file, etc.
Though Maven, Gradle, IntelliJ IDEA, and Eclipse help you to give the basic structure you still need to be proficient in those two skills to get a head start and if you are not familiar with Maven or your IDE, it can be a nightmare.
Spring Boot Initializer solves this problem and makes it easy to create a Spring-based Java application without really knowing about a lot of internal details of the Spring framework.
It's a really useful tool for both Spring Application developers and Java guys and If you want to learn in-depth, I suggest you check out this list of some of the best Spring boot courses.
That's all about some of the essential features of Spring Boot which Java developers should know. These features really make working with Java and Spring fun and productive and that's why more and more companies are adopting Spring Boot for Java development.
Java developers with Spring Boot experience are also in good demand and if you are looking for your next job as a Java web developer then Spring Boot skills can really make a difference.
If you are interested in learning Spring Boot in-depth, the following resources can help you:
Other Java and Spring Articles you may like
- 15 Spring Boot Interview Questions for Java Developers (questions)
- Top 5 Courses to Learn and Master Spring Cloud (courses)
- 5 Free Courses to Learn Spring Framework (free courses)
- 20+ Advanced Spring Boot Interview Questions (list)
- 5 Courses to Learn Spring Security for Java developers (courses)
- Top 5 Spring Boot Annotations Java Developers should know (read)
- 10 Free Courses to learn Spring Boot in-depth (courses)
- @SpringBootApplication vs @EnableAutoConfiguration? (answer)
- 10 Free Courses to learn Spring Framework (courses)
- 5 Spring Books Experienced Java Developer Should Read (books)
- 10 Courses to learn Microservice Architecture in Java (courses)
- Top 5 Frameworks Java Developer Should Know (frameworks)
- 10 Spring MVC annotations Java developer should learn (annotations)
- Top 5 Spring Cloud annotations Java programmer should learn (cloud)
- 5 Courses to learn Spring Cloud for Beginners (courses)
P. S. - If you are keen to learn Spring Boot but looking for free online training courses then you can also check out this Introduction to Spring Boot 2 and Spring Framework 5 free course on Udemy. In this 2.5 hours course, you will learn how to use Spring Boot 2 to create a Java web application with a database. This course is completely free and you just need a free Udemy account to join this course.


How about @Transacational, @SpringBootTest, and @WebMvcTest annotations?
ReplyDelete