Hello guys, if you are writing test for your your Spring Boot application then Sooner or later, you'll come across @Mock and @MockBean annotations while testing your Spring Boot application. Both annotations generate fake or Mock objects, but for different reasons and its important for Java and Spring Boot developer to know the correct difference and when to use @Mock and @MockBean while writing tests. It's possible that this will seem perplexing at first, in face I was confused for a long time until I did my research and cleared it up. But, you don't need to scan through internet, In this blog article, I'll clear up any misunderstandings and clarify the difference between @Mock and @MockBean when testing Spring Boot apps.
In the past, I have shared many articles and resources to learn Spring boot like best Spring boot courses, best Spring Boot books, and Spring Boot Interview questions and this one I will answer the popular question about @Mock and @MockBean. It's also an important topic for Spring certification and this question is even mentioned in Official Spring Certification Exam guide. So, what's the wait. let's understand the difference between @Mock and @MockBean
1. What is @Mock annotation?
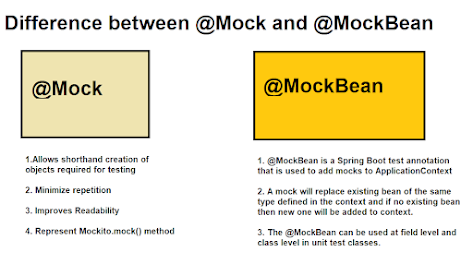
The @Mock Annotation represent Mockito.mock() function which can be used to mock any object. It's worth noting that we should only utilize it in test classes. We must enable Mockito annotations to utilize this annotation, unlike the mock() function.
We may accomplish this either by running the test using the MockitoJUnitRunner or by directly invoking the MockitoAnnotations.initMocks() function.
Let's understand this by an example. Let's set up a java class and then create a test class that demonstrates the same.
Suppose we have a service names MyService which has some methods which perform a few operations related to the prices of cars. The service class is as shown below:
@Service
public class MyService {

  private final Client client;

  private Set<String> cars = Set.of("BMW", "AUDI", "MERCEDES",
 "LAMBORGHINI");

  public MyService(Client client) {
    this.client = client;
  }

  public BigDecimal getLatestPrice(String carCode) {
    if (cars.contains(carCode)) {
      return BigDecimal.valueOf(Double.MAX_VALUE);
    }

    try {
      return client.getLatestStockPrice(carCode);
    } catch (Exception e) {
      e.printStackTrace();
      return BigDecimal.ZERO;
    }
  }
}
If you guys are wondering about where we got the Client, please don't. we are just trying to write a unit test for a class. so minimum coupling is recommended.
Now, take a 5-minute break and try to write unit tests for the above service class.
Below is the unit test for the same.
import org.junit.jupiter.api.Test;
import org.junit.jupiter.api.extension.ExtendWith;
import org.mockito.InjectMocks;
import org.mockito.Mock;
import org.mockito.junit.jupiter.MockitoExtension;

import java.math.BigDecimal;

import static org.junit.jupiter.api.Assertions.*;
import static org.mockito.Mockito.when;

@ExtendWith(MockitoExtension.class)
class MyServiceTest {

  @Mock
  private Client client;

  @InjectMocks
  private MyService cut;

  @Test
  void shouldReturnDefaultPriceWhenClientThrowsException() {

    when(client.getLatestStockPrice("BMW"))
      .thenThrow(new RuntimeException("Remote System Down!"));

    BigDecimal result = cut.getLatestPrice("BMW");

    assertEquals(BigDecimal.ZERO, result);
  }
}
Now, if you check the unit test, you will find that we have used Mockito to run the tests. we have annotated the class with @ExtendWith which will work as extended at the class level. Now, Mockito annotations will work.
If you check, we have @Mock annotation on Client class because we need client class in our test but we do not want to invoke the original class. so, we 'Mock' that class which works the same as the original but is actually just a mock.
JUnit Jupiter (a JUnit 5 module) and Mockito are used in the preceding test. Because we don't want an actual instance of this class, we tell Mockito to construct a fake. Mockito's JUnit Jupiter plugin will then take care of instantiating and injecting the mock into our test class.
If you think about Spring's dependency injection when you see @InjectMocks, the phrase inject might be deceptive. This is a Mockito utility that relieves us of the responsibility of constructing an instance of the class under test. In a word, Mockito will look for a suitable public function Object() { [native code] } to create an instance of our MyService and pass it all mocks (there is just one).
2. What is @MockBean annotation in Spring Boot?
While the preceding piece was relevant to utilizing plain JUnit 5 (or JUnit 4) with Mockito regardless of application framework, the next section is solely applicable to the Spring Framework.
We can create a custom Spring Context for our test using Spring Boot's excellent test support. We either utilize the complete Spring Context (@SpringBootTest) or a sliced context (e.g. @WebMvcTest or @DataJpaTest) most of the time. With a mimicked Servlet environment, we may test the integration of several classes or, for example, the web layer in isolation.
A Spring Test Context is now used for such tests. We may request beans from this context, which is equivalent to the application context during runtime (@Autowired). It usually only comprises a portion of our beans (making our tests faster).
When we start the Spring Test Context, we must fulfill all of our Spring beans' dependencies (talk collaborator). We accomplish this by putting an instance of them inside the Spring Context for Spring to inject. The context will not start if this is not done.
We may choose whether we want the real or mocked version of one of our beans within the Spring Test Context since we can tailor it to our needs.
Let's create a controller to explain better.
@RestController
@RequestMapping("/api/cars")
public class MyController {

  private final MyService service;

  public MyController(MyService service) {
    this.service = service;
  }

  @GetMapping
  public BigDecimal getCarPrice(@RequestParam("carCode") String carCode) {
    return service.getLatestPrice(carCode);
  }
}
Now the test for the same would be as below:
@WebMvcTest(MyController.class)
class MyControllerTest {

  @MockBean
  private MyService service;

  @Autowired
  private MockMvc mockMvc;

  @Test
  void shouldReturnCarPriceFromService() throws Exception {
    when(service.getLatestPrice("BMW"))
      .thenReturn(BigDecimal.TEN);

    this.mockMvc
      .perform(get("/api/cars?stockCode=BMW"))
      .andExpect(status().isOk());
  }
}
Now, if you observe, we have used @MockBean here to mock the service. This is because we have a context up and we can mock the service itself as a bean.
To add fake objects to the Spring application context, we may use the @MockBean annotation. Any existing bean of the same type in the application context will be replaced by the mock.
If there are no beans of the same type declared, a new one is created. This annotation is useful in integration tests if a specific bean has to be mocked, such as an external service.
Best Practices to use @MockBean annotation in Spring Boot?

When to use @Mock and @MockBean annotations?
- @Mock is used when the application context is not up and you need to Mock a service/Bean.
- @MockBean is used when the application context(in terms of testing) is up and you need to mock a service/Bean.
- @MockBean imitates the behavior of a real Bean and injects the mocked bean after finding it from the application context.
- 15 Spring Data JPA Interview Questions with Answers
- Top 10 Courses to Learn Microservices with Spring Boot
- 13 Spring Boot Actuator Questions for interviews
- How to implement LDAP authentication in the Active directory
- How to enable Spring security in a Java web application?
- 20+ Spring Boot Interview Questions for Java developers
- 20 Spring Boot Testing Interview Questions with Answers
- 15 Spring Cloud Interview Questions with Answers
- How to get ServletContext object in Spring controller
- Top 15 Microservice Interview Questions with Answers
- How to limit the number of concurrent active sessions in Java web app
- What is the use of DispatcherServlet in Spring MVC?
- Difference between @RestController and @Controller in Spring MVC?
- How Spring MVC works internally?
- 10 Best Spring Framework Courses for Beginners
- 17 Spring AOP Interview Questions with Answers
- 10 Advanced Spring Boot Courses for Experienced Developers
Thanks for reading this article so far. If you find this Spring Boot + JUnit + Hamcrest + Mockito example useful, please share them with your friends and colleagues. If you have any questions or feedback, then please drop a note.


No comments :
Post a Comment