Installing JDK is the first step in learning Java Programming. If you are
using Windows 8 or Windows 7 Operating System, then installing JDK is quite
easy as you just need to follow instructions given by the Java SE Installation
wizard. The only thing which requires some attention is, choosing the correct JDK
installer based upon, whether you are running with 32-bit or 64-bit Windows 8
or Windows 7 OS. JDK 7 is the latest Java version but JDK 6 is still most popular
in the software and programming world. You can choose to install JDK 7 or JDK 6 based
on your course material.
In this Java tutorial, we will learn how to install JDK 7 in Windows 8 operating system by following step by step guide. Another thing, which is part of JDK installation is setting PATH for Java in Windows 8, will enable us to run javac and java commands from any directory in Windows 8. See that link for step by step guide on setting PATH in Windows 8.
Though I will use the Windows 8 operating system to install JDK 7, You can still install JDK 6 or 7 in Windows 7 by following those steps. In order to choose the correct JDK installer, we first need to check if Windows is running with 32-bit or 64-bit Windows 8.
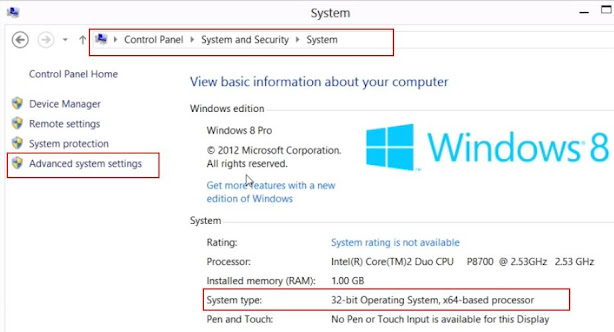
For that you can go to Control Panel-->System and Security and check System Type, if it shows 32-bit operating system means you need Windows x86 Java The installer, if it shows 64-bit operating system then you need Windows x64 Java Installer. Let's see steps involved to install JDK 6 or JDK 7 in Windows 8 operating system.
In this Java tutorial, we will learn how to install JDK 7 in Windows 8 operating system by following step by step guide. Another thing, which is part of JDK installation is setting PATH for Java in Windows 8, will enable us to run javac and java commands from any directory in Windows 8. See that link for step by step guide on setting PATH in Windows 8.
Though I will use the Windows 8 operating system to install JDK 7, You can still install JDK 6 or 7 in Windows 7 by following those steps. In order to choose the correct JDK installer, we first need to check if Windows is running with 32-bit or 64-bit Windows 8.
For that you can go to Control Panel-->System and Security and check System Type, if it shows 32-bit operating system means you need Windows x86 Java The installer, if it shows 64-bit operating system then you need Windows x64 Java Installer. Let's see steps involved to install JDK 6 or JDK 7 in Windows 8 operating system.
Steps to install JDK 7 in Windows 8
Here is a step by step guide to install JDK 7 on Windows 8, both 32-bit and
64-bit version. You can also install JDK
6 both x86 and x64 installer on Windows 7 by following these steps. Just
remember that Windows x86 is used for 32-bit Windows 7 or Windows 8 and x64 the installer is used for 64-bit Windows 7
or 8.
1. Find
if Windows 8 is 32-bit or 64-bit.
As described in first paragraph, you can find if Windows 8 or Windows 7 is
32-bit or 64-bit by checking System Type in Control Panel-->System
and Security-->System and then looking at System Type Properties.
2.
Download correct JDK 7 installer from Java download sites
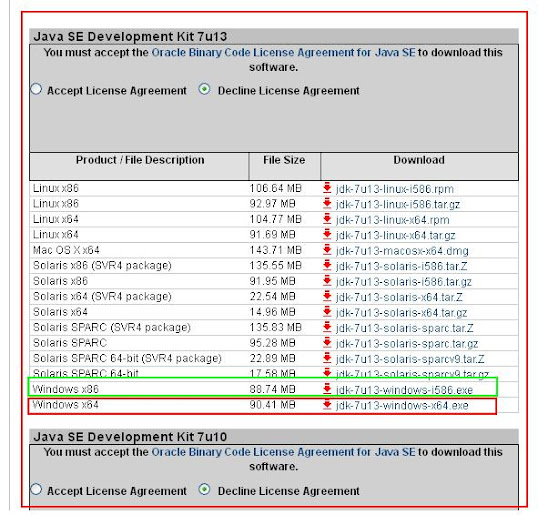
Go to Java SE download site http://www.oracle.com/technetwork/java/javase/downloads/index.html
and select Java Platform (JDK) 7u13, which is latest Java SE release.

Choose Windows X86 installer (marked as green) if you are running 32-bit Windows 8 or choose Windows x64 Java installer (marked in red), if you are running with 64-bit Windows 8 Operating system.
3. Install JDK by double clicking on Windows installer
Once you download correct JDK installer, rest of installation is like
installing any other Windows based application. Just follow Instruction given
by Java SE Installation Wizard. Good thing is that now JavaFX is included as
part of JDK 7, so you don't need to separately install JavaFX.
4.
Include JDK bin directory in Windows 8 PATH environment variable.
Once JDK Installation is complete, you can see JDK directory in C:\Program
Files\Java\jdk1.7.0_13\. This is default JDK installation directory and
Installation wizard install Java here if you haven't changed it during
installation. In order to compile Java code from any directory in your Windows
8 or Windows 7 machine, you need to include C:\Program
Files\Java\jdk1.7.0_13\bin directory in the PATH environment variable. This is called setting PATH for Java. See this step-by-step Java programming tutorial to set PATH for JDK 7 in Windows 8.
That's all on How to install JDK 7 in Windows 8 operating system.
As I said, You can follow same steps to install JDK on Windows 7 as well. In
order to verify JDK installation, just type javac command in command prompt, if
you don't see error 'javac'
is not recognized as an internal or external command, it means JDK is
installed and ready to use. Now, it's time to create your first Java program,
See this tutorial to write Helloworld
in Java. In order to learn more about PATH and Classpath see the following tutorials :


7 comments :
Great tutorial Javin, very helpful, as I am able to install JDK 7 in my windows 8 notebook. Can you also post similar tips to install JDK 7 on Macbook air i.e. on Mac OS and Linux as well? that would be great help to beginners like me.
These instructions are also good to install Java runtime on Windows 8. Instead of downloading JDK, you just need to download JRE from same location. Since I only use Java to execute programs and I am not coding them, I prefer to install JRE than JDK to save some of my computers resources including disk memory and CPU.
In windows 7-64 bit or windows 8, in step #3 you want to run the installer using "Run as administrator", otherwise the installer skips some files without any error messages. One file that is missed is jre/lib/tools.jar. Maven users will fall in this trap and find maven errors referring to the JDK.
its all right i installed it for my windows8 64 bit os when i typed javac or java the long outputs are also visible but when i want to write a program by typing edit prog.java its giving as unrecognised
Thanx.....this document is really helpful for installing jdk versions.
Its a simple way to understand anyone.
can i use jdk8 for windows7?
@Anonymous, Yes you can use JDK 8 on Windows 8. Just remember to download the 64-bit version of JDK8 though as Windows 8 is mostly 64-bit operating system.
Post a Comment