Hello guys, if you are looking for an example to create a Spring MVC application then you have come to the right place. Earlier, I have shared the best courses to learn Spring MVC, Books, and interview questions and In this tutorial, we are going to explain how to create your first MVC application with the spring framework. At present, there are many applications in the world, and developing them is also varies according to the performance, type of the application, and many other factors. However, one of the primary languages used for application development is Java with the model-view-controller (MVC). Here comes the spring framework for application development and will go through an example project to explain this further.
1. What is Spring MVC?

2. What is MVC?
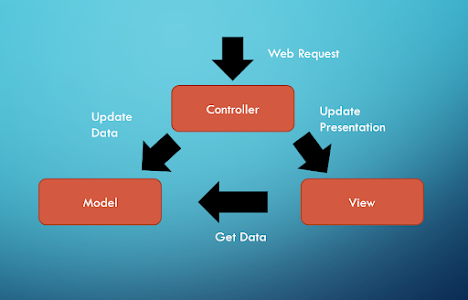
MVC stands for model-view-controller and this is mostly used for flexible and loosely coupled web applications. In there, we can divide this into three logics namely, input logic, business logic, and the user interface. Will have look at the Model, View, and Controller below.
Model - This consists of Java objects as the main purpose is to encapsulate data
View - Mainly made out with HTML as this allows to have data present to outside.
Controller - Builds up the required model by using user requests.
3. spring initializer

<?xml version="1.0"
encoding="UTF-8"?>
<project xmlns="http://maven.apache.org/POM/4.0.0" xmlns:xsi="http://www.w3.org/2001/XMLSchema-instance"
xsi:schemaLocation="http://maven.apache.org/POM/4.0.0
https://maven.apache.org/xsd/maven-4.0.0.xsd">
<modelVersion>4.0.0</modelVersion>
<parent>
<groupId>org.springframework.boot</groupId>
<artifactId>spring-boot-starter-parent</artifactId>
<version>2.5.0</version>
<relativePath/> <!-- lookup parent from repository -->
</parent>
<groupId>com.codexlabs</groupId>
<artifactId>spring-cloud-config-server</artifactId>
<version>0.0.1-SNAPSHOT</version>
<name>spring-database-server</name>
<description>Demo project for Spring Boot</description>
<properties>
<java.version>11</java.version>
<spring-cloud.version>2020.0.3</spring-cloud.version>
</properties>
<dependencies>
<dependency>
<groupId>org.springframework.boot</groupId>
<artifactId>spring-boot-starter</artifactId>
</dependency>
<dependency>
<groupId>org.springframework.boot</groupId>
<artifactId>spring-boot-starter-test</artifactId>
<scope>test</scope>
</dependency>
</dependencies>
<build>
<plugins>
<plugin>
<groupId>org.springframework.boot</groupId>
<artifactId>spring-boot-maven-plugin</artifactId>
</plugin>
</plugins>
</build>
</project>
You can just copy-paste this pom.xml file into your project to download all the required dependencies for this project.
4. Model Class.
package com.school.model;
public class Student {
private String firstName;
private String lastName;
private int age;
public String getFirstName() {
return firstName;
}
public void setFirstName(String firstName) {
this.firstName = firstName;
}
public String getLastName() {
return lastName;
}
public void setLastName(String lastName) {
this.lastName = lastName;
}
public int getAge() {
return age;
}
public void setAge(int age) {
this.age = age;
}
}
5. Controller Class.
@Controller
public class StudentController{
@Autowired
private StudentRepository studentRepository;
@GetMapping("/students")
public List<Student> getAllStudents();
@GetMapping("/students/{id}")
public ResponseEntity<Student> getStudentById(@PathVariable(value="id") Long studentId){
Student student = studentRepository.findById(studentId);
if(student == null){
return new ResponseEntity(errors, HttpStatus.SERVICE_UNAVAILABLE);
}
return new ResponseEntity(student, HttpStatus.OK);
}
@PostMapping("/students")
public Student addStudent(@Valid @RequestBody Student student){
return studentRepository.save(student);
}
}
In the above code, the @Controller is used to represent this as a web controller.
6. Run the Application.
import org.springframework.boot.SpringApplication;
import org.springframework.boot.autoconfigure.SpringBootApplication;

@SpringBootApplication
public class ServingWebContentApplication {

    public static void main(String[] args) {
        SpringApplication.run(ServingWebContentApplication.class, args);
    }

}
By the way, you may know that @SpringBootApplication is a convenience annotation that adds all the following,
1. @Configuration: Tag the class as a source of bean definitions for the application context.
2. @EnableAutoConfiguration: Tell Spring Boot to start adding beans based on classpath settings, other beans, and various property settings. For example, if Spring-webmvc is on the classpath, this annotation flags the application as a web application and activates key behaviors such as setting up a DispatcherServlet. You can further see this article to learn more about the difference between @SpringBootApplicaiton and @EnableAutoConfiguration in Spring Boot.
3. @ComponentScan: Tells Spring to look for other components, configurations, and services in the ex- com/example package, letting it find the controllers.
The main() method uses Spring Boot's SpringApplication.run() method to launch an application. Have you noticed that there isn't a single XML line? A web.xml file is also missing. You didn't have to worry about plumbing or infrastructure with this web application because it's entirely written in Java.
What exactly is the difference between normal java Applications and Spring MVC applications? So let's have a look into this.

Spring’s MVC module is based on front controller design pattern followed by MVC design pattern.
All the incoming requests are handled by the single servlet named DispatcherServlet which acts as the front controller in Spring’s MVC module.
The DispatcherServlet then refers to the HandlerMapping to find a controller object which can handle the request.
DispatcherServlet then dispatches the request to the controller object so that it can actually perform the business logic to fulfil the user request.
(Controller may delegate the responsibility to further application objects known as service objects). The controller returns an encapsulated object containing the model object and the view object (or a logical name of the view).
In Spring’s MVC, this encapsulated object is represented by class ModelAndView. In case ModelAndView contains the logical name of the view, the DispatcherServlet refers the ViewResolver to find the actual View object based on the logical name. DispatcherServlet then passes the model object to the view object which is then rendered to the end user.
That's all about how to create a Spring MVC application using Spring Framework and Spring Boot. So in this tutorial, we have discussed how to create your first MVC application with spring framework. Hope you understand this tutorial and as beginner to spring framework, you need to have a basic idea of how things going with the spring framework. Hope you understand this and see you in the next tutorial.
Until then bye.
Other
Java and Spring Tutorials and examples you may like
-
What is @Conditional annotation in Spring? (conditional example)
-
Top 5 Frameworks Java Developer Should Know (frameworks)
-
10 Advanced Spring Boot Courses for Java developers (courses)
-
Difference between @RequestParam and @PathVariable in Spring (answer)
-
Top 7 Courses to learn Microservices in Java (courses)
- How to update entity using Spring Data JPA? (example)
-
How to use @Bean in Spring framework (Example)
-
Spring Data JPA Repository (JpaReposistory example)
-
20+ Spring MVC Interview Questions for Programmers (answer)
-
13 Spring Boot Actuator Interview questions (boot questions)
-
Difference between @Autowired and @Inject in Spring? (answer)
-
Top 5 Courses to Learn and Master Spring Cloud (courses)
- 5 Spring Cloud annotations Java programmer should learn (cloud)
- 5 Courses to learn Spring Cloud for Microservices (courses)
- How Spring MVC works internally? (answer)
- Spring Data JPA @Query Example (query example)
-
5 Courses to Learn Spring Security for Java programmers (courses)
-
Top 5 Spring Boot Annotations Java Developers should know (read)
-
10 Spring MVC annotations Java developer should know (annotations)
-
15 Spring Boot Interview Questions for Java Developers (questions)
-
Difference between
@Component,
@Service, and
@Controller
in Spring (answer)
Thanks for reading this article so far. If you find this
Spring MVC Tutorial and Example, then please share it with
your friends and colleagues. If you have any questions or feedback, then
please drop a note.
P. S. - If you are a beginner and want to learn the Spring Framework from
scratch and look for some of the best online resources, you can also check
out these best Spring MVC courses for beginners. This list contains free Udemy and Pluralsight courses to learn Spring
MVC from scratch.


No comments :
Post a Comment