Spring Boot has taken the Spring framework to the next level by drastically
reducing the configuration and setup time required for spring projects. You
can create a project with practically no settings and begin developing the
features that are most important to your application.
In this spring boot tutorial, you will learn how to develop RESTful web services API for CRUD operations on an MySQL database. The CRUD operations include creation, retrieve, update and delete operations.
1. Create the Project
There are many ways to create a project in spring. One of the methods is
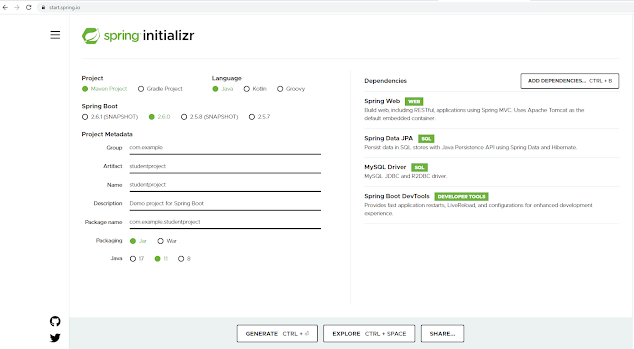
using Spring Initializer to bootstrap an application quickly. You need to go
to http://start.spring.io/ and follow the steps below to generate a new
project.
Enter the following details to create our example project.
Group : com.example
Artifact: studentproject
Pacakge : com.example.studentproject
The dependencies will be added to our pom.xml file and if you want, you can
add more dependencies or reduce them manually later on.
|
Once all the details are entered, click to GENERATE to create and download your customized initial project. Spring Initializer will generate the project with the details you have entered and download a zip file with all the project folders.
The below picture is showing the structure of the project.
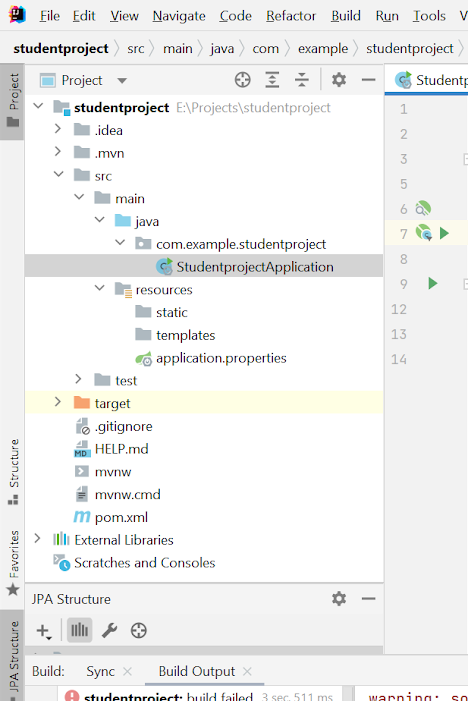
Let's have a look into important directories inside the project.
2. The main entry point of the application.
The
StudentprojectApplication Class is the main entry point of our spring boot application.
package com.example.studentproject;

import org.springframework.boot.SpringApplication;
import org.springframework.boot.autoconfigure.SpringBootApplication;

@SpringBootApplication
public class StudentprojectApplication {

   public static void main(String[] args) {
      SpringApplication.run(StudentprojectApplication.class, args);
   }

}
This contains the
@SpringBootApplication annotation
which is a combination of the following specific annotations.
@Configuration - Spring
bootstraps any class annotated with the @Configuration annotation and
uses it as a source for other bean definitions.
@ComponentScan - It
instructs Spring to look for and bootstrap any other components in the
current package.
@EnableAutoConfiguration
- This annotation instructs Spring to configure your application
automatically depending on the dependencies you specified in the pom.xml
file.
3. Resources folder
This directory is dedicated to all the static resources, templates, and
property files.
This folder may have the following subfolders depending on your project.
1. resources/ static
2. resources/templates
3. resources/application.properties - This is used to store the
application-wide properties of your application and helps wot read those
properties to configure your application. This file can have the
server's default port, server's context path, database URL, etc.
4. Configure MYSQL database
As we mentioned above, the application.properties
file is responsible for keeping the configurations of our application.
In there, we specify the port number and also the database connection
information.
server.port=8080

spring.jpa.hibernate.ddl-auto=update
spring.datasource.url=jdbc:mysql://localhost/starbucks?createDatabaseIfNotExist=true
spring.datasource.username=root
spring.datasource.password=
spring.jpa.database-platform=org.hibernate.dialect.MySQL5InnoDBDialect
Here, you need to update the URL username and password according to your
MySQL database server.
5. Code Domain Model Class
Next, create the
Student class to map with the
product table in the database as follows.
package com.student.crudapp.model;
import com.student.crudapp.repository.StudentRepository;
import org.springframework.beans.factory.annotation.Autowired;

import javax.persistence.*;

@Entity
public class Student {

    @Id
    @GeneratedValue(strategy=GenerationType.AUTO)
    private int id;

    private String name;

    private String email;

    private String grade;

    public int getId() {
        return id;
    }

    public void setId(int id) {
        this.id = id;
    }

    public String getName() {
        return name;
    }

    public void setName(String name) {
        this.name = name;
    }

    public String getEmail() {
        return email;
    }

    public void setEmail(String email) {
        this.email = email;
    }

    public String getGrade() {
        return grade;
    }

    public void setGrade(String grade) {
        this.grade = grade;
    }

    @Override
    public String toString() {
        return "Student{" +
                "id=" + id +
                ", name='" + name + '\'' +
                ", email='" + email + '\'' +
                ", grade='" + grade + '\'' +
                '}';
    }
}
This is a simple domain model class, with class names and field names
are identical to table names and column names in the database. This
allows you to have a minimum number of
JPA annotations.
6. Code Repository Class
package com.student.crudapp.repository;
import com.student.crudapp.model.Student;
import org.springframework.data.jpa.repository.JpaRepository;

import java.util.List;

public interface StudentRepository extends JpaRepository<Student, Integer> {

    List<Student> findAll();
    Student findById(int id);
    int deleteById(int id);


}
The
spring data JPA
will generate implementation code for the most common CRUD operations
and you do not need to stick with customized queries. This is one
advantage that you will get from using the spring data JPA.
7, Code Service Class
This service class acts as a middle layer between the persistence layer
and the controller layer. Create the
StudentService class like
below.
package service;

import com.student.crudapp.model.Student;
import com.student.crudapp.repository.StudentRepository;
import org.springframework.beans.factory.annotation.Autowired;
import org.springframework.stereotype.Service;

import javax.transaction.Transactional;
import java.util.ArrayList;
import java.util.List;

@Service
@Transactional
public class StudentService {

    @Autowired
    StudentRepository studentRepository;

    //Get all the students
    public List<Student> getAllStudents() {
        List<Student> students = studentRepository.findAll();
        return students;
    }

    //display one student by id
    public Student getStudentById(int id) {
        return studentRepository.findById(id);
    }

    //save student in database
    public void saveStudent(Student student) {
        try{
            studentRepository.save(student);
        }
        catch(Exception e){
            e.printStackTrace();
        }
    }

    //delete stuednt by id
    public void deleteStudent(int id) {
        try{
            studentRepository.deleteById(id);
        }catch(Exception e){
            e.printStackTrace();
        }
    }

}
All the methods are executed in transactions because this
studentService class is
marked with the
@Transactional annotation.
8. Code REST Controller Class
This is the class which is dealing with RESTful APIs for CRUD
operations. Below is the code:
package com.student.crudapp.controller;

import com.student.crudapp.model.Student;
import com.student.crudapp.repository.StudentRepository;
import org.springframework.beans.factory.annotation.Autowired;
import org.springframework.stereotype.Controller;
import org.springframework.web.bind.annotation.*;

import java.util.List;

@Controller
public class StudentController {

    @Autowired
    StudentRepository studentRepository;

    //check the api's working correctly api
    @RequestMapping(value="/ping", method=RequestMethod.GET)
    @ResponseBody
    public String healthCheck() {
        return "This is working well";
    }


    @RequestMapping(value="/students", method=RequestMethod.GET)
    @ResponseBody
    public List<Student> getAllStudents() {
        return studentRepository.findAll();
    }

    @RequestMapping(value="/student", method=RequestMethod.POST)
    @ResponseBody
    public Student addStudent(Student student) {
        return studentRepository.save(student);
    }

    @RequestMapping(value="/findstudent", method = RequestMethod.GET)
    @ResponseBody
    public Student findStudent(@RequestParam("studentId") int studentId) {
        return studentRepository.findById(studentId);
    }

    @RequestMapping(value= "/updatestudent", method = RequestMethod.GET)
    @ResponseBody
    public Student updateStudent(@RequestBody Student student){
        return studentRepository.save(student);
    }

    @RequestMapping(value="/deletestudent", method = RequestMethod.GET)
    @ResponseBody
    public int deleteStudent(@RequestParam("studentId") int studentId) {
        return studentRepository.deleteById(studentId);
    }
}
Here, the
@Controller annotation
is used to expose the RESTful APIs. The rest controller still takes
advantage of the spring's dependency injection.
9. Code Spring Boot Application Class
To run our application, we need to have the main class as below. This is
an inbuilt class and you just need to run this class to run the entire
project.
package com.student.crudapp;

import org.springframework.boot.SpringApplication;
import org.springframework.boot.autoconfigure.SpringBootApplication;

@SpringBootApplication
public class CrudappApplication {

   public static void main(String[] args) {
      SpringApplication.run(CrudappApplication.class, args);
   }

}
This class will start embedded Tomcat server hosting our Spring Boot web application.
The project will run on port 8080 and url http://localhost:8080/

10. Test the API and Project
So let's have a look at APIs in this project. We used the Postman to test the APIs created.
1. Add a student (POST Request)http://localhost:8080/student{ "name": "test", "email": "test@gmail.com", "grade": "05" }2. Get all students (GET Request)http://localhost:8080/students3. Find a student (GET Request)
http://localhost:8080/findstudent?studentId=1
4. Update a student (GET Request)
http://localhost:8090/updatestudent
{
"name": "testupdated",
"email": "testupdated@gmail.com",
"grade": "05"
}
5. Delete a student (GET Request)
http://localhost:8090/deletestudent?studentId=1
That's all about how to use MySQL database with Spring Boot in Java
application. This tutorial referred to the creation of a basic crud
functionality using the spring boot, MySql, Jpa and hibernate. As you
develop more, there are a lot of things to learn in the spring boot. So We
successfully built a Restful CRUD API using Spring Boot, Mysql, JPA, and
Hibernate. Hope to see you in the next tutorial. Until then bye!
- 10 best Spring Framework courses for Java developers
- What is the use of DispatcherServlet in Spring MVC?
- 10 Advanced Spring Boot Courses for Java programmers
- 5 Books to Learn Spring MVC Framework
- How to enable Spring Security in Java Application?
- Top 5 Courses to become a full-stack Java developer
- How Spring MVC Framework works internally?
- Spring MVC Interview Questions
- 10 Free Courses to learn Spring Framework
- 10 Free Courses to learn Spring Boot for Java programmers
- 10 Courses to learn Microservices in Java
- 10 Advanced Spring Security OAuth2 and JWT courses
- How to control the number of active sessions for a User?
- 25 Spring Security Interview Questions with Answers
Thank you for reading this Spring Boot and MySQL tutorial so far. If you have any questions or doubt please ask in comments.


3 comments :
Hi. Thanks for the tutorial. It was helpful.
What is the use of 'StudentService' class, if methods from StudentRepository itself is called in the Controller?
@RequestMapping(value="/student", method=RequestMethod.POST)
@ResponseBody
public Student addStudent(Student student) {
return studentRepository.save(student);
}
in this method you should use " @valid @RequestBody "annotations otherwise data not save.null .....
thank you
Yes, 'StudentService' class is not used at all what is big mistake.
Post a Comment